You may have seen it on TikTok/Instagram and thought, I'll try that too! Well, you're in luck, because here you'll learn exactly how it's done.
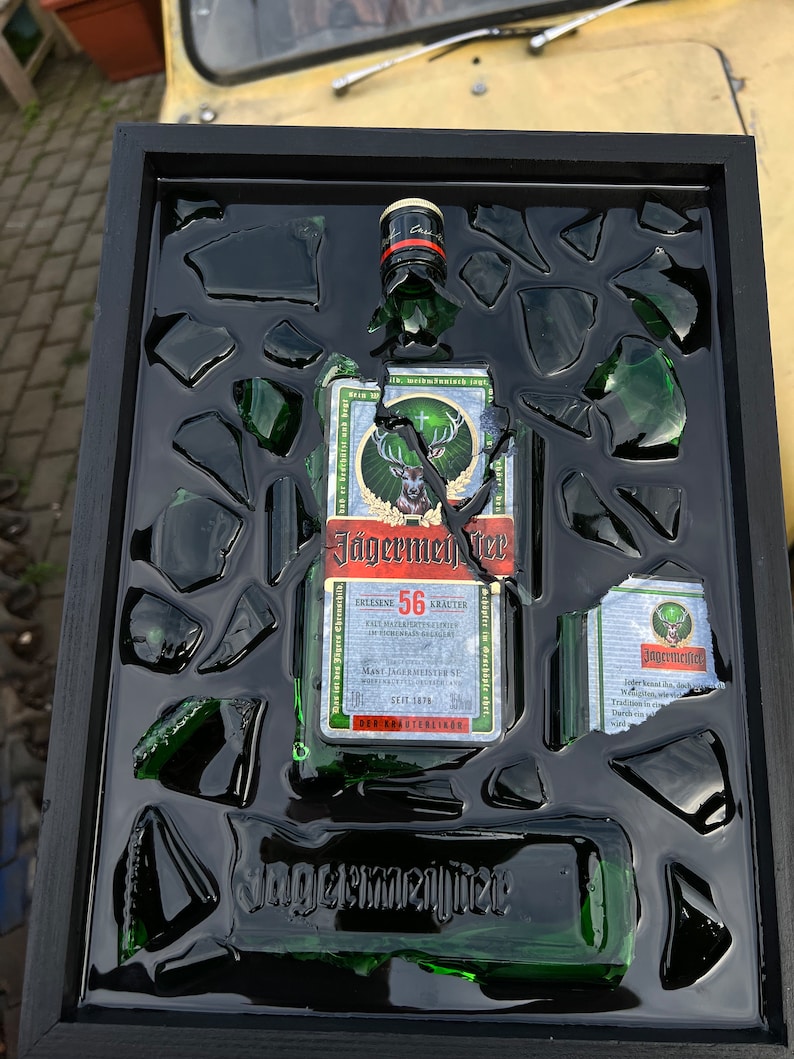
Epoxy art has become increasingly popular in recent years, and there are many ways to add a unique twist to your artwork. One of the most fascinating materials you can include in your epoxy projects is broken glass. Here I explain how you can create a beautiful epoxy painting using broken glass bottles.
Please contact us if you have any questions, use the chat function on this page.
Materials:
- Epoxy for casting with
- Cleaned glass bottle you want to immortalize
- Jägermeister, a good Champagne or maybe Whiskey?
- A large plastic container or other container to catch all the glass pieces
- A hammer, glass breaker or similar
- A frame (new or old)
- Safety glasses and gloves
- Suitable space to work, with air exchange and safe work areas
- A mixing bowl and a stirring stick
- Food coloring or paint (optional)
Procedure:
-
Preparing the broken glass: Start by setting out the container in which you will break the bottle. It must be large enough to swing the hammer slightly. Then put on your safety goggles and place the lid (preferably) partially over the container to prevent flying glass. Lower the bottle into the box and hold it with one hand and the hammer in the other.
Another trick to prevent glass from scattering can be to wrap the bottle in an old cloth or a heavy plastic bag, but these should then be carefully cleaned or disposed of properly. -
Crushing 1: Start by crushing down the side, near the bottom of the bottle (this can vary depending on the bottle you have, but generally start at the bottom). You may need to hit it several times to break it, so start gently and work your way up in force. Once you have broken it, you need to assess the pieces. Remember to handle the pieces carefully to avoid damage.
-
Consider glass pieces: Not all bottles break the same, and after the first break, you need to assess where you should focus your next break. For example, is there writing on the glass that you want to preserve? Or do you want to break it? A label that is particularly important? Think through it, and get ready for the second round.
-
Crushing 2: Once you have assessed how the crushing has gone and where to strike, you can continue carefully with the hammer and strike firmly where you want to further shatter the bottle, to produce your ideal glass pieces.
-
Select glass pieces: Not all pieces will be ideal for your artwork, for example there will be many small pieces that you don't need. Select pieces that have the right shapes and place them on the frame to test, until you are satisfied. Here you may have to break even more to get the right shape.
-
Prepare the frame: Take the frame or mold you are going to use and make sure it is waterproof. Epoxy flows easily, so the frame cannot have any place for the epoxy to flow through, for example you can use paint, acrylic or a thin layer of epoxy first). Then make sure the frame is free of debris, grease and silicones. Acetone is a good agent to use on a small rag to wipe over the frame. This helps to ensure a good bond between the epoxy and the mold.
- Calculate epoxy quantity: Measure the inside of your frame in cm to calculate volume. In addition, you need to know the thickness you want. For this project, you usually only need about 1-2mm of epoxy (which is 0.1-2cm). Feel free to use the volume calculator below.

-
Mixing the epoxy: Follow the instructions that come with the epoxy you have chosen carefully, including wearing protective equipment such as goggles and disposable gloves. Generally, you will want to mix the resin with the hardener in a specified ratio by weight or liter, for example 3:1 for X-Cast and 2:1 for CCR , but this should be on the bottle or on the product page where you purchased the epoxy. See more tips for mixing epoxy correctly . Mix gently to minimize bubbles in the mix. After mixing the epoxy, it is a good idea to let it sit for a while to allow the epoxy to rise to the top and crack. To completely remove all microscopic bubbles, you can use a vacuum chamber, but this is not necessary if you have a good casting epoxy.
-
Add Color (Optional): If you wish to color the epoxy, you can now add colorants or paint. Mix well to ensure the color is evenly distributed.
-
Watch video example : Before we go any further, watch this example:
-
Apply epoxy to the surface: Now for the fun part. Now that the glass is laid out and the frame is tight, you can pour the epoxy out slowly in a thin stream. To help the epoxy cover the entire surface, it may be advantageous to use a clean mixing stick or similar. Lay the frame flat so that the epoxy can self-level and become completely flat. Pour some epoxy over the glass pieces as well so that you are sure that they stick well.
-
Allow to cure: Follow the instructions on the epoxy product for curing time. This can vary, but most good casting epoxies require at least 24 hours to fully cure.
- Finish and display: Once the epoxy has fully cured, your artwork is ready to display! Hang it in a suitable location and bask in the brilliance of broken glass, epoxy, and your newfound skills! Congratulations!
Tip:
- Always remember to work in a well-ventilated area when using epoxy, rooms with ventilation are often sufficient, but check the safety data sheet for the products you use.
- You can also add other decorative elements such as colors, writing, paint, glitter and more to give your artwork an extra special touch.
Enjoy the process and the results will follow!
Do you have any comments about the guide? More questions? Tips you would like to share? Contact us through the chat on this page. By the way, for such a project we recommend CCR Entropy casting epoxy with fast curing.
Leave a comment
All comments are moderated before being published.
This site is protected by hCaptcha and the hCaptcha Privacy Policy and Terms of Service apply.