Hello, dear Storbua family!
We are overwhelmed by the incredible interest and commitment you show for Storbua.no and the knivmakeriet. We love that you share photos of the amazing knives you make with our materials that you gild with your skills. It is incredibly inspiring to see how you bring your creativity to life through the great projects!
We want more people to send us photos, but we do understand that not everyone feels comfortable taking photos, or thinks they are particularly good at it. Perhaps you are unsure how best to highlight your work? But fear not, we're here to help! Here's a simple guide to taking the best photos of your homemade knives.
1. Use plenty of natural light
Light is your best friend when it comes to taking pictures. It is often wise to avoid direct sunlight which can create harsh shadows and strong reflections, but it is important to have plenty of light and preferably natural light. Try shooting by a window or outdoors on a cloudy day to get soft, diffused light. In any case, the most important thing is to avoid taking pictures inside a room with normal lighting . Although it seems bright enough here and there, it is often too dark to take good pictures. See an example of a photo with far too little light here: 
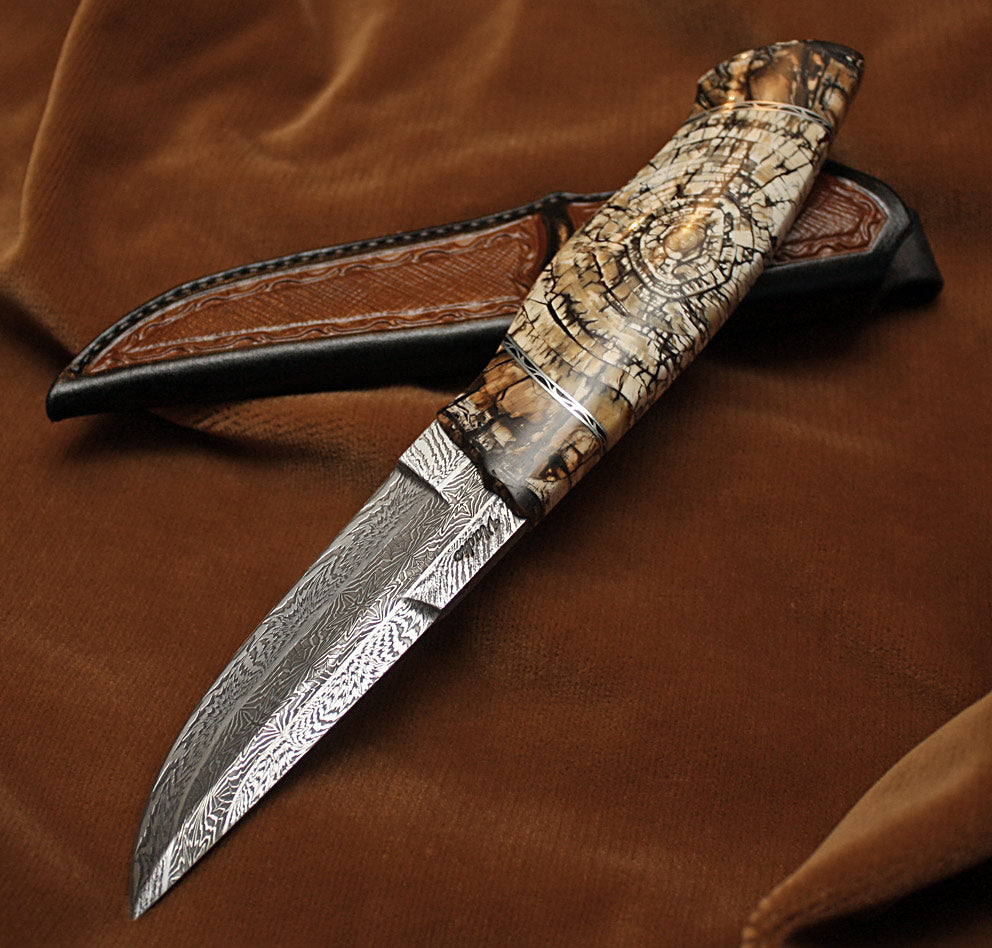
2. Think about the background
The place you take the photo determines the background. The simple is often the best and a simple, neutral background will help to focus on the knife, such as a table, a blanket, a stone or a tree stump works very well. But it often works well to hold the knife up with nature in the background because the focus then falls on the knife and the background becomes blurred so that the knife comes out extra. See examples of these ways below. 

3. Take pictures from different angles
Don't hesitate to experiment with different angles. Look at the camera and move it around to see how the knife looks from different sides and don't hesitate to take pictures. Take pictures from the side, from above, from below, close up for details, and from a distance to show the whole knife. You can review and delete the worst ones later. See example below of how the shape of the knife appears as a result of the choice of angle. Here, the light on the right also helps to better bring out details at the edge and shaft.


4. Bring out the details
It's best if you get all the details in one photo, but that's not always possible, and you've put a lot of work into your knife, so make sure you capture the details. Take close-up photos of the blade, the shaft, and any special details you are proud of.

5. Have fun!
The most important thing is to have fun and be creative. This is your opportunity to showcase your great work so make it part of the creative process, have fun and be proud! Sometimes it's fun to make a little scene
Remember, there is no 'right' or 'wrong' way to photograph your work. We are not experts in photography, but hope some of the tips may have been useful. Anyway, we're just happy to see what you can do! So, pick up your camera (or phone) and start snapping!
We look forward to seeing more pictures of the wonderful knives you make. Share your photos with us at Storbua.no and use the hashtag #StorbuaKniv to let us and others admire your wonderful craftsmanship.
Good luck and even wish for a creative day ahead!
Martin from Storbua
www.Storbua.no
Leave a comment
All comments are moderated before being published.
This site is protected by hCaptcha and the hCaptcha Privacy Policy and Terms of Service apply.